


Drop shoulder design explained for designers and makers
Drop shoulder design places the shoulder seam deliberately below the natural shoulder line, typically 1–4 inches (2.5–10 cm) below the shoulder bone, according to Sew Guide’s construction overview. That single shift changes everything downstream: the sleeve cap flattens, the torso reads wider and boxier, and the armhole opens up enough to layer a hoodie or knit underneath without binding.
Three immediate implications for pattern and fit:
- The bodice block needs extra width across the chest and back to accommodate the lowered seam.
- The sleeve cap height drops significantly compared to a set-in sleeve, which means a standard sleeve block cannot simply be attached without modification.
- Ease at the bicep increases automatically, giving the arm more room but also requiring careful sleeve width control to avoid an unintentional sack shape.
Pro Tip: Mark the natural shoulder point on your dress form with a pin before you start drafting. Every measurement in a drop-shoulder spec flows from that reference point, and losing it mid-draft costs time.
Key takeaways
Drop shoulder design is defined by a shoulder seam placed 1–4 inches below the natural shoulder point, which requires coordinated changes to the sleeve cap, armhole depth, and bodice width to produce the intended silhouette.
| Point | Details |
|---|---|
| Defining measurement | The shoulder seam sits 1–4 inches (2.5–10 cm) below the natural shoulder point. |
| Clear drop threshold | A drop of 2 inches (5 cm) is the standard benchmark where the seam reads as intentionally dropped. |
| Sleeve cap adjustment | Reduce sleeve cap height from ~14–15 cm to ~10–11 cm when drafting a 5 cm drop. |
| Grading strategy | A constant drop in centimetres across sizes keeps silhouette consistent in casual and streetwear collections. |
| Styling balance | Pair with fitted bottoms to offset the volume at the shoulder and upper torso. |
Table of Contents
- What does drop shoulder design actually measure?
- How does drop shoulder differ from set-in, raglan, and kimono sleeves?
- How to draft a drop-shoulder pattern from a basic block
- Key measurements and sizing guidelines for drop-shoulder garments
- Construction and production considerations for reliable manufacture
- How to style drop-shoulder tops and where they work best
- Which visuals best communicate drop-shoulder construction?
- How to prototype and fit-check a drop-shoulder garment
- Why drop shoulders belong in a considered collection
- Sources
What does drop shoulder design actually measure?
The Cutting Class glossary defines the dropped shoulder as a construction where the armhole falls on the top of the arm rather than at the shoulder point itself. In practice, that means three distinct measurement zones matter: the natural shoulder point (the bony tip of the shoulder), the new shoulder seam line (where the seam is repositioned), and the vertical drop between them.
Common drop ranges break down into three practical tiers:
| Drop category | Vertical drop (cm) | Vertical drop (inches) | Visual effect |
|---|---|---|---|
| Slight/intentional | 1–2 cm | 0.5–1 in | Subtle relaxed shoulder, reads as a soft set-in |
| Clear drop shoulder | 2–5 cm | 1–2 in | Distinctly dropped, boxy silhouette |
| Oversized/extreme | 5+ cm | 2+ in | Exaggerated, sleeve falls onto upper arm |
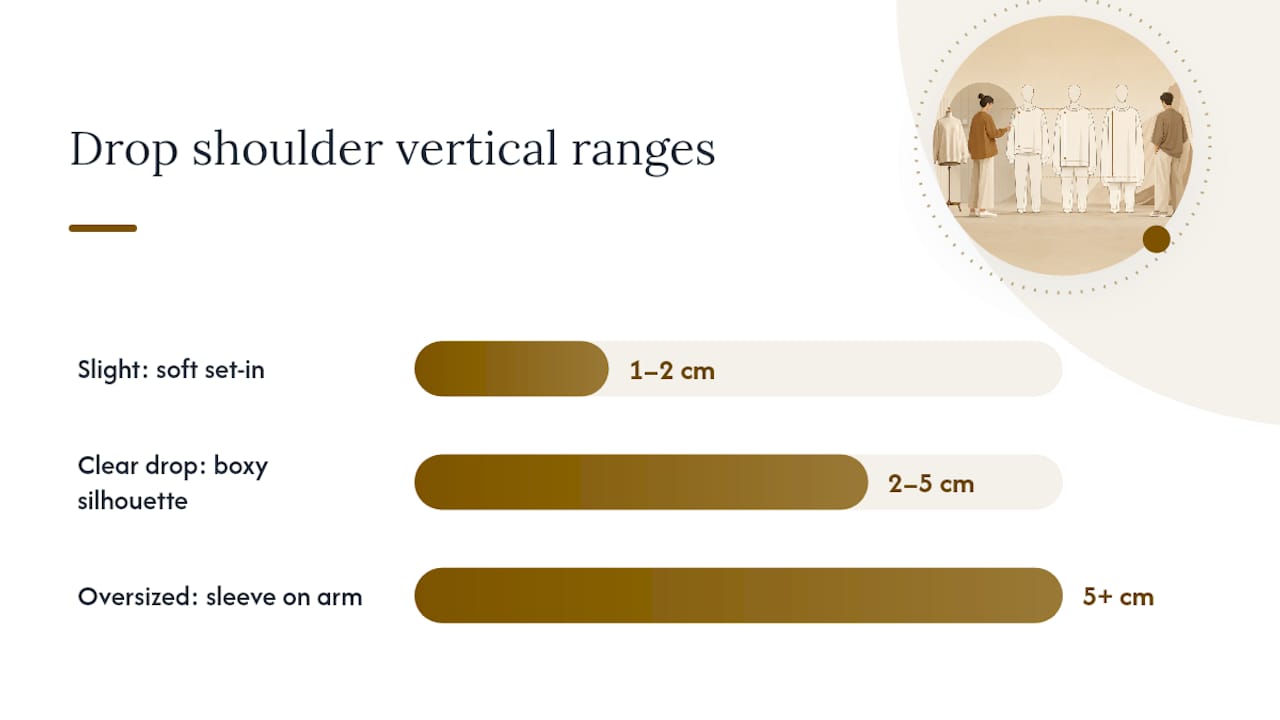
A slight drop of 1–2 cm can read as a fit error rather than a design choice. According to the Crescendo Apparel guide, the lowered seam creates a relaxed silhouette with wider sleeves and softer shoulder lines, which is the intended aesthetic outcome. For that outcome to register clearly, most patternmakers treat 2 inches (5 cm) as the threshold where the seam reads as intentionally dropped rather than a grading mistake.
Pro Tip: When writing a tech pack for a factory, always state the drop measurement as a vertical distance from the natural shoulder point, not as a total shoulder width. A shoulder-width spec alone does not communicate where the seam should sit.
How does drop shoulder differ from set-in, raglan, and kimono sleeves?
The core difference between drop shoulder and set-in construction is seam location. In a set-in sleeve, the armhole seam sits precisely at the shoulder point, and the sleeve cap is shaped with a high, curved head to match a deeply curved armhole. Drop shoulder moves that seam outward and downward, flattening the cap and widening the armhole opening.
Raglan sleeves share the relaxed-arm feel of a drop shoulder but use a diagonal seam running from the neckline to the underarm, which eliminates the shoulder seam entirely. Kimono construction integrates the sleeve into the bodice as one cut piece, making it the simplest to sew but the hardest to fit precisely across sizes.
When to specify drop shoulder over the alternatives:
- Choose drop shoulder when you want a defined shoulder line with a relaxed fit, such as in sweatshirts, oversized tees, or structured knitwear.
- Choose raglan when arm mobility is the priority and a visible shoulder seam would interrupt the design.
- Choose kimono when construction simplicity matters more than precise fit, typically in loose blouses or casual resort wear.
- Avoid drop shoulder in tailored suiting where shoulder definition and sleeve pitch precision are critical, unless the design intent is deliberately deconstructed.
How to draft a drop-shoulder pattern from a basic block
Before you touch a pencil, gather your starting blocks: a fitted bodice block (front and back), a standard sleeve block, and a clear mark of the natural shoulder point on both.
When you lower the shoulder seam, you are not just moving a line — you are changing the relationship between the armhole depth, the sleeve cap height, and the torso width all at once. Adjust all three together, or the sleeve will pull, bag, or twist.
Step-by-step drafting sequence for a medium size:
- Mark the drop distance. Measure down from the natural shoulder point along the shoulder line. For a clear drop shoulder, use 5 cm (2 inches) as your starting value.
- Extend the shoulder line. Draw the new shoulder seam point 5 cm outward and slightly downward from the original shoulder point.
- Redraw the armhole. Connect the new shoulder point to the underarm point with a shallower curve. The armhole depth typically increases by 1.5–2 cm to accommodate the lower seam.
- Add bodice width. Add 1–2 cm ease to the chest and back width at the underarm level to prevent pulling across the torso.
- Modify the sleeve cap. Lower the sleeve cap height to match the new, shallower armhole. For a 5 cm drop, reduce the cap height from a standard 14–15 cm to approximately 10–11 cm.
- Widen the sleeve head. The sleeve cap width must increase to match the longer armhole opening. Measure the new armhole circumference and adjust the sleeve head accordingly.
- True the seam lines. Walk the sleeve seam against the armhole seam to confirm they match in length. Add notches at the front and back balance points.
- Check seam allowances. Add 1 cm seam allowance to the armhole and sleeve cap, and confirm the grainline runs straight down the sleeve centre.
The most common pitfall is adjusting the shoulder line without recalculating the sleeve cap height. A cap that is too high for the new armhole creates a ridge at the top of the sleeve; one that is too low produces a baggy pocket of fabric under the arm.
Pro Tip: Draft the sleeve cap overlay directly on top of the new armhole trace before cutting any fabric. If the curves do not align within 0.5 cm, correct the sleeve head before proceeding to muslin.
Key measurements and sizing guidelines for drop-shoulder garments
Seven measurements define a drop-shoulder spec. Record all of them before grading across sizes.
Grading the drop measurement across sizes is a decision that affects how the silhouette reads at each end of the size range. Two approaches exist: a constant drop (the seam sits the same physical distance below the shoulder point in every size) or a proportional drop (the distance scales with the grade increment). A constant drop keeps the silhouette consistent and is the more common choice for casual and streetwear collections. A proportional drop is occasionally used in tailored or structured garments where the shoulder-to-sleeve relationship needs to track body proportion more closely.
Sew Guide’s drop-shoulder overview confirms the typical sleeve placement range of 1–4 inches below the natural shoulder line, which maps directly to the slight, clear, and oversized tiers in the measurement table above.
Construction and production considerations for reliable manufacture
Sewing sequence matters more in drop-shoulder construction than it does for set-in sleeves, because the flatter armhole is easier to sew flat before closing the side seams.
Recommended sewing sequence:
- Sew the shoulder seams and press them flat.
- Attach the sleeve to the bodice while both pieces are still open (flat construction method). This gives the machine operator a straight run along the armhole rather than sewing in a circle.
- Close the side seam and sleeve underarm seam in one continuous pass from hem to cuff.
- Finish the armhole seam allowance before closing the side seam when using woven fabrics prone to fraying.
Fabric selection by silhouette intent:
- Soft drape fabrics (modal jersey, viscose, lightweight French terry) suit pronounced oversized drop shoulders where the sleeve is meant to fall loosely down the arm.
- Firmer knits (ponte, structured cotton jersey, sweatshirt fleece) work better for a clear drop shoulder that holds its shape without collapsing.
- Woven fabrics (cotton poplin, linen blends) require careful armhole stay-stitching to prevent bias distortion along the curved seam.
QC checkpoints for bulk production:
- Shoulder seam position: measure the drop from the natural shoulder point on every fifth unit in a bulk run.
- Sleeve hang: the sleeve should hang straight from the seam without twisting forward or backward.
- Armhole integrity: check that the seam allowance is not clipped too close at the curve, which causes seam failure under arm movement.
- Left-right symmetry: compare both shoulder seam positions against the centre back neck point.
Pro Tip: On lightweight knit fabrics, apply a narrow strip of fusible stay tape along the shoulder seam line before sewing. Without it, the seam stretches during handling and the drop measurement shifts between your sample and your bulk run.
How to style drop-shoulder tops and where they work best
The Crescendo Apparel overview places drop-shoulder construction squarely in t-shirts, sweatshirts, and knitwear, and that is where the silhouette performs most naturally. The relaxed shoulder line reads as intentional rather than sloppy when the rest of the garment is proportioned to match.
Styling pairings and proportion rules:
- Pair with slim or straight-leg trousers, fitted jeans, or tapered joggers to balance the volume at the top.
- A half-tuck into high-waisted bottoms defines the waist without fighting the relaxed shoulder.
- Layer a drop-shoulder knit over a fitted turtleneck or long-sleeve base for winter depth. The open armhole accommodates the extra layer without binding, which is one of the practical layering advantages the construction offers.
- Avoid pairing with wide-leg trousers unless the garment is cropped; two oversized silhouettes together lose all proportion.
Collection and customer segment fit:
- Streetwear: the drop shoulder is a defining feature of the streetwear aesthetic, where an exaggerated seam drop of 5+ cm signals intentional oversizing rather than a sizing issue.
- Loungewear and knitwear: the construction suits relaxed-fit pullovers and cardigans where comfort and ease of movement are the primary brief.
- Outerwear: a slight drop of 2–3 cm in a coat or jacket softens the shoulder line without losing structure.
Pro Tip: For petite customers, keep the drop to 2–3 cm and shorten the torso length proportionally. A 5+ cm drop on a short torso pushes the sleeve seam past the mid-upper arm, which visually shortens the arm and overwhelms the frame.
Which visuals best communicate drop-shoulder construction?
Clear images do more work than a paragraph of spec text when communicating drop-shoulder construction to a factory or pattern grader.
Essential visuals to prepare:
- Flat pattern overlay showing the original shoulder line and the new dropped seam line side by side, with the drop distance dimensioned.
- Sleeve cap overlay traced on top of the new armhole to confirm the curves match.
- Mannequin or fit model photo with the shoulder seam highlighted (a coloured thread or tape works well) and the drop distance marked with a callout line.
- Underside of the armhole showing the seam finish and stay tape placement.
Annotation checklist for each image:
- Natural shoulder point (mark with a dot and label it “NSP”).
- New shoulder seam point with the drop distance in cm and inches.
- New armhole stitch line, distinguished from the seam allowance line.
- Grainline arrow on the sleeve piece.
- Seam allowance width (typically 1 cm) called out at the armhole.
- Front and back balance notches on both the armhole and sleeve cap.
The Chanel autumn–winter 2014 collection demonstrates that dropped shoulder seam lines appear in tailored garments as well as casual ones, which is worth noting in a tech pack when the design intent is structured rather than relaxed. A runway reference image alongside the flat pattern helps a factory understand the intended silhouette outcome, not just the measurement.
Alt-text guidance: Write alt text as a description of what the image shows technically, for example: “Flat pattern piece showing bodice front with original shoulder line in grey and new drop-shoulder seam line in red, 5 cm drop labelled.”
How to prototype and fit-check a drop-shoulder garment
A muslin (toile) is non-negotiable for a new drop-shoulder block. The flat-looking pattern can hide fit surprises that only show up on a three-dimensional body.
Proto plan:
- Cut the muslin in a fabric with similar weight and stretch to the intended production fabric.
- Sew using the flat construction method: attach the sleeve before closing the side seams.
- Place the muslin on a dress form or fit model and mark the natural shoulder point with a pin.
- Measure the actual drop from the shoulder bone to the seam and compare it to the spec.
- Check sleeve hang: the sleeve should fall straight without rotating forward or backward.
- Test arm movement: raise the arm to 90 degrees and check for pull lines across the chest or back.
- Adjust sleeve cap height or bodice width as needed, then re-cut and re-sew the affected pieces.
- Record every change with a measurement note before moving to the next fit loop.
Fit-check checklist:
- Shoulder seam sits at the intended drop distance (within 0.5 cm of spec).
- No diagonal pull lines from armhole to opposite hip (indicates bodice width is too narrow).
- Sleeve hangs straight from the seam with no forward or backward rotation.
- Bicep ease measures at least 5–6 cm more than the actual bicep circumference.
- Underarm seam sits comfortably below the armpit, not digging in.
- Side seams hang perpendicular to the floor.
Most drop-shoulder styles reach a satisfactory fit in two fit loops: one to confirm seam placement and sleeve hang, and a second to refine ease and proportion after the first corrections. A third loop is typically needed only when the fabric behaves differently from the muslin.
Pro Tip: Photograph the fit from the front, back, and side at every loop, with the natural shoulder point pinned and visible. Comparing photos across loops is faster and more reliable than relying on written notes alone.
Why drop shoulders belong in a considered collection
Drop-shoulder construction is one of those design decisions that looks simple from the outside and reveals its depth the moment you start drafting. The seam placement is a single number on a spec sheet, but it cascades through the sleeve cap, the armhole depth, the bodice width, and the grading strategy. Getting it right means understanding the whole chain, not just moving a line.
At 16thavenue, the drop-shoulder silhouette shows up across several product categories precisely because it does two things at once: it reads as relaxed and contemporary, and it fits a wider range of bodies without complex grading. The women’s oversized t-shirt in the collection is a clear example of a clear drop shoulder executed in a soft knit, where the seam sits far enough below the shoulder point to read as intentional rather than oversized by accident. The loose oversized shirt takes the same principle into a woven fabric, which requires the stay-stitching and flat-construction approach described earlier.
What designers sometimes underestimate is the styling constraint the construction creates. A pronounced drop shoulder narrows the range of bottoms that work with it. Pair it with volume below the waist and the outfit loses its shape entirely. The construction is generous, but the styling has to be deliberate.
Sources
- Drop shoulder style in fashion — Sew Guide
- Glossary: Dropped Shoulder - The Cutting Class
- Chanel autumn–winter 2014 gallery — Vogue UK